Tuesday, April 24, 2012


1991 Dodge Ram D350 Cummins Customization - Part 3

Splashpan Painting
This was the first application of the Nason John Deere Green paint - 4 parts paint, 2 parts reducer, and 1 part activator. I apologize for the shirt I am wearing.


Alot of the time between my last post and this one has been on cleaning and painting the engine, which has made a world of difference. This picture shows the rough condition that the firewall and heater hoses were in, rough meaning dirty.


Here is the Heater/AC box and blower motor prior to removal.


Here is after, that paint is simply beautiful.


Empty Heater/AC Box


Heater/AC box with new evaporator core and heater core installed.


Heater/AC box installed


Heater/AC box from the inside.


Driver-side of the firewall before primer and paint.


Same area after priming, this has all been painted green since, just did not have a picture of it.


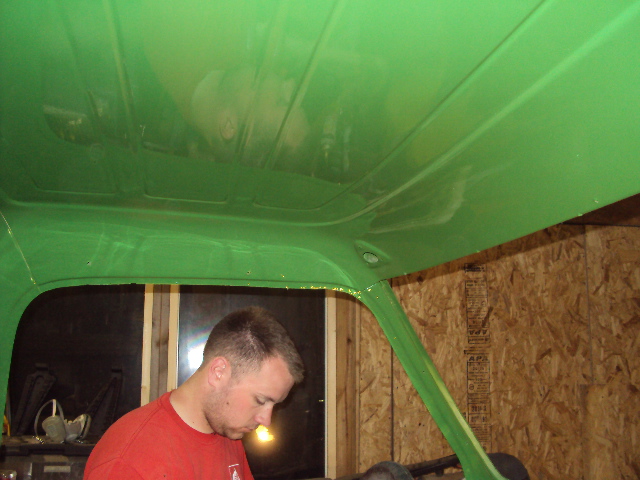
John Deere Green ceiling.


Underside of hood.


The hood has had countless hours spent on it and we are still working on getting it just right since it is a very visible show surface.


This was after the first application of paint, which has since been sanded mostly off and had further body work done to eliminate low spots and orange peel.


My cheerleader Badger. No he was not eating the snow salt...


Here is a shot of the truck with the splashpan removed. The fan was removed as well and painted black, while the block and many of the accessories were painted gray.


After painting and reassembly of the fan, splashpan, and radiator. Looks very sharp.


With the AC Condensor added.


Inner fenders after being painted black. We have reapplied undercoating on the insides of them to improve noise reduction.


Our main focus going forward is to finish prepping the rest of the exterior of the cab and get a first coat of paint on it.


Thursday, March 1, 2012

1991 Dodge Ram D350 Cummins Customization - Part 2

We continue to make great progress on this project. The past week has been spent prepping and priming - mostly on secondary surfaces, so alot of what you see below will not be visible to most people, but it needed to be done and it is what we believe separates a great project from a mediocre one.  

The factory sealer that runs along the firewall and floor seam was in need of repair in this area, so we used asphalt sealer that is actually made for roofing purposes. It wasily filled the voids and will maintain a necessary elasticity.


Passenger side after being primed. This is where the heater box gets installed, so this surface will not actually be seen once it is reassembled.
Finally putting some green on! This is not the same paint that will be used for all of the show surfaces.

There were tears... of pride. It is a shame this will get covered by a rubber mat...


Dad getting ready to prime.

 
Priming the underside of the hood
 
This color of primer was recommended by the auto body store for use with John Deere Green paint. (I appreciated them not laughing when they discovered what color we are painting the truck).
Priming the inside of the cab.
 
Cab is primed. we found out our technique for applying it was not the most efficient way, so the rest should be easier/more correct. Part of the reason we did the cab floor and ceiling first is because they are secondary surfaces that will not actually be seen when finished, so we could "practice" here and learn from our mistakes.
Firewall with a fresh coat of primer.


Primed splash pan - its amazing how a coat of paint (or primer) can make something look like new.


Here is the truck with the splash pan removed for priming/painting.

Wednesday, February 22, 2012

1991 Dodge Ram D350 Cummins Customization - Part 1

I bought this truck on February 18th, 2006, with the intention of doing the appropriate body work to do a customized paint job with John Deere Green (what other colors are there?). Unfortunately, after replacing the throwout bearing, pilot bushing, upper and lower ball joints, and installing new brakes, the truck was parked in the shed for 5 1/2 years until I graduated from college. Other things took priority and my under-estimation of the amount of work it would take to do the job correctly quickly discouraged me. Other than going out to the shed to do the occassional "start-up" to make sure it wasn't dead, the truck did not move. Now, in 2012, we have gotten back to working on it and are starting to make real progess on getting the job done.

I am using this blog as a way to track the project and help illustrate progress that is made (and hopefully get tips, advice, and/or interest from others). I have not decided how I will divide up the individual blogs (e.g. if I will split them into differents aspects of the project or simply in given time frames), but given the variability in our work methods, it will probably be more focused on time. The text applies to the picture above it.


Here is how the truck looks presently (except for the driver-side fender, which has been removed). This leaves only the cab (save the doors) and splashpan attached to the truck, all other pieces have been removed so that body work and paint prepping can be done properly. I believe pictures of the truck in its original condition when I bought it do exist, but are not currently accessible. I hope to have those soon, you'll probably laugh that someone would spend money on something so rough. However, I've always loved this style of truck and will very proud if we complete it, knowing no other like it exists.


The cab has been stripped down to where only the wiring harness, steering colum and wheel, and rubber backing for the cab-side of the firewall remain. As this is being written, substantial progress has been made on this part of the project, but I will provide pictures and details in the next blog. I want to focus solely on the very start (Ground Zero) of the project in this one.


The dash has been removed (obviously) as well as all other interior molding pieces. All will be painted the same color (this process has been started). I am having difficulty finding replacement molding for the interior, so if anyone has any leads on that I would greatly appreciate it. Some of the pieces have been cracked or completely broken and I would prefer to replace them if possible, although I would imagine only whole sets can be purchased from anyone other than a salvage yard.


The powerhouse - 5.9 Liter Cummins Turbo Diesel 5 Speed - 317,000 miles. 1989 - 1993 models of this truck are known as "First Generation." The series is now in its 4th generation, which includes 2010 and newer models.


Like the driver seat? Yes, it runs.

I welcome all comments and advice along the way. This is as much a learning process as it is anything else. My dad is the real brains behind the operation. From his late teens to well into his 20's, he did body and mechanical work on vehicles for a living, so his experience is invaluable and his patience with doing the job right will properly be more appreciated by me when the project is done that it is right now... One thing I will not disclose until the project is completed is the amount paid for the truck, paint, or any other parts of the project (I'd rather finish it and be proud of it than think of the money that is currently sitting in a shed, so to speak). Thanks for reading!